Showing posts with label Home. Show all posts

Wednesday, September 19, 2012

Homemade Ice Pack

So my daughter has been down for about 6 days now with a herniated disc.  Not fun and no health insurance to help.  So she has been booking it to the Chiropractor 3 times a week.  Last Monday we got her a Tens machine and some natural anti-inflammatories.  We were also instructed to ice her back several times a day.  Well have you seen how much reusable ice packs are?  And we needed half a dozen to rotate so one is always frozen.  So off to my pinterest boards to see if I had a recipe to help.  Yup and here it is:

3/4 cup dawn dish washing detergent
1/4 cup rubbing alcohol
1/2 cup water

Put it all in a Ziploc bag and then shove the whole thing into a food saver bag and seal it up.  I tried just putting the mixture in the food saver without the Ziploc and sucked the mix into the trough to seal it.  What a mess! So I put it in a Ziploc, with as much air out of it as possible, laid flat inside of the food saver bag and sealed it up.  Look, no leaks!  Or I should qualify it - No leaks outside of the food saver bag.

 
It also does not set up hard like water would.  It's very flexible.  Works amazingly well.

Enjoy!

Tuesday, September 18, 2012

Homemade Dog Shampoo

So Pippa is now 8 months old and weighs 65 lbs. (this is an old shot of her).  Anyway pretty much weekly since she was tiny we give her a bath - actually it's more like a shower - actually it's more like we ALL get a shower :)   So I finally used up the dog shampoo I bought months ago and wanted to find a lower cost alternative since the 1/2 gallon of soap runs about $20.  I treat my dog's hair better than I do mine, but we just couldn't swing the big bucks this time.  So I found this on the Internet and tweaked it a bit.  To my surprise, it worked wonderfully well :)   But the site had no picture that I could 'pin' so I couldn't save the information.  So I'm putting it here.

 
I used a 1 gallon container - Milk Jug, whatever.  Rinse it thoroughly.
Into it put:
1 1/2 cups of Dawn dish washing detergent (no antibacterial stuff)
1/4 cup glycerin (you can get this at any pharmacy not too pricey)
1/4 cup apple cider vinegar
1 cup of totally pulverized oatmeal (used the Vitamix)
additional options include:
Several drops of essential oils (I used lavender)
2 T vitamin E oil (again you can get this at any pharmacy - I didn't use it)
Then fill the jug to the top with Water.
Shake like crazy and your done.
Simple.
Don't use too much even though it seems watery - the soap takes forever to wash off if you do.
 
Enjoy!

Wednesday, July 11, 2012

Backyard and 'OUR POND' :)

Welcome to the garden part of my backyard.  Last year I read a book by Mel Bartholomew on square foot gardening and decided to abandon my old traditional gardening method in favor of this.  Results are that I have had more produce in a smaller area and less trouble with my garden. 


The big pompom flowers are the onions going to seed from last fall.  There is Zucchini in the front and Cucumber plants on the bamboo on the right (this morning I was looking at them an they have almost reached the top of the bamboo and have lots of little cucumbers in view).


Second square foot planting bed with tomatoes and peppers.  On the left are two small squares with zucchini in them.  In the back is the final hurrah for my cauliflower (I planted them too late and got no produce off them but they sure looked amazing). 


In the side area is the tiered flower bed and the potato box.  Your looking at peppers, strawberries, beets and herb on the top.  The weird uprights are holding a netting to keep the birds from eating everything. Worked well.


Close up of my zucchini plant.  No I don't know why I put this in.  Maybe because I have a spade in the shot.  I have spades all through out the garden.  You'll see them in other shots.  Makes it easier to get rid of weeds.


Patio Tomato.  The reason why we have our garden fenced off is in a couple of blogs back.  Her name is Pippa and she is a omnivore and eats absolutely everything.


Just a quick shot of our pond.  Made it ourselves - you can probably tell.  Love our waterfall.


Looks like Mickey Mouse right - well maybe only in my head.  We made the bowls out of concrete.  and then lined the spillway with a piece of copper.  Took a ton of work but came out wonderful.  I had these two ginormous bowls that I used for food services when I do a church event.  Bought them at a restaurant supply.  We sprayed them with pam and then filled them with concrete (the bowls needed a bit of cleaning at the end but came out fine).  Then we pushed a mold (from some weird pot thing we found at the Dollar store)into the center of the concrete to make the 'Mickey' and scooped out some of the concrete on the side to provide an area later for the spillway.  We had to weigh down the mold since it wanted to float to the top and we used old pieces of 2 x 4's in the area where the spillway was to help keep the shape till it all set.  We left it for 24 hours and then filled the bowls with water and left it for a week.  Then we broke it out and let it set for a couple of days.  We sealed it with a concrete sealer (otherwise it weeps) and glued the copper spillway in place (if you don't have the spillway then the water tends to travel down the side of the bowl).  We have a piece of plastic piping in the side of the top pot, we put it in when we made it, we just need to glue the tube from the pump that you see coming over the top into the piping and we're done.

Enjoy!

My Front Yard

Okay so this year we finally created a halfway decent front yard.  I had convinced my husband that he did not want to mow any more and we let the grass in the yard die.  Well that was way back in the summer of 2006, unfortunately in the spring of 2007 I got cancer, again, long story, so the yard just sat and grew weeds.  Well we finally got back to it.  And . . . . I love it :)


The brick work was inspired by something I saw on Pinterest.  I just modified it to sweep around the rosemary and the bird bath.  And of course I LOVE my bathtub.  A good friend was dumping it and I and got it for FREE :)   Thank you Kris!  I put pots in it so I can change it out at different seasons.  These pictures are from early in the season so I was waiting for Daffodils and Tulips to make their debut.  Later pictures have the Gladiolas and Dahlias.


Better shot.  You can see the raised patio in the back.  This is an early shot - no swing.


Truly my house is not this blue.  But this is the way the shot came out.  So don't you just love the fence.  We designed it ourselves.  Cutting down 1" x 6" x 6' boards into smaller boards to create the slats on the fence and to create dimension we put some on the front and some on the back.  We used a jig to make sure that the spacing stayed the same.  I sprayed the whole thing with clear deck stain when I was done to keep the redwood looking new.  See the patio in the back with the still in process swing (I have to create a sling for it before it will hold anyone).  Plants across the front includes white cloud roses and lantana.  We also planted peter pan agapanthus by removing and old one in another part of our yard and then dividing it up.  Saved some bucks :)


Shot from another direction.  That's an almond tree in the center front of the yard.  At some point it may get too large but at least it will shade the front of the house.  And a small lemon in the blue pot on the left.  Grown from a seed.  No flowers or fruit yet but I'm hoping soon.


We added a pot on the patio and you can see my unfinished swing.  We tore apart the old stuffing on it and I decided to make a sling to string over the old framework, then I will add cushions.   Our ground cover is just bark chips over landscaping cloth.

So we're almost done.  Everyone that stops by tells us that they love it.  Including strangers just driving by.  Woooohooo for us :)

Wednesday, June 6, 2012

Porch Upgrade . . . In Process

Okay so my front porch was far from welcoming.  Actually it was down right ugly.  It still needs some paint but I moved out the large pot (which left a large stain) and painted an old chair red.  Then I updated the wreath with some cheerful pink.  But the crowning achievement is the fence (place French Horns trumpeting here) and a cute welcome sign (created by my Daughter and her Cricut).  I love it!


I think I will have to paint the concrete porch at some point - I tried bleach and baking soda and it just made it worse.   And the mailbox needs to be more understated (bought spray paint for that job).  And of course I had to take the picture when the sun was not shining.  I will update that on another day.

So do you want to make your own :)
So to create your own awesome fence you need:
1 - 4" x 4" (measure to see how long you need - I wanted ours to start on the step below)
1 - finial top with a screw bottom
1 - wedged shaped top (it goes under the finial and on top of the 4" x 4")
1 - 2" x 4" (again you are going to have to measure and then double it)
And enough fence boards to cover your area
Wood Screws
Mollies and Bolts for the wall
White wash paint and brush
Electric Drill and Electric Screw Driver
Circular Saw or Chop Saw

First you need to cut the 4" x 4" to the right height.  Then chop the back off the wedge shaped top so that when it is on the top of the 4" x 4" it mounts flush with the wall.  Then drill and screw in the finial top. Creating your 4" x 4" post.

Then cut the 2" x 4"s to match the necessary length to go from the 4 x 4 post to the wall.  Mount the 2" x 4"s to the 4" x 4".  We just eyeballed exactly where we wanted the horizontals to go on our 'fence' and drilled pre holes and then screwed it in with wood screws. 

Then we mounted it onto the wall with Mollies and bolts.  It went into the mortar in our brick wall.  We made sure that the bolts would be accessible after the fence boards were attached so that I could take it down and paint the wall (and the fence) later.

Then we put on the fence boards.  We created our own pattern.  If you really want to do this on the cheap and have a table saw then you can do what we did.  Buy the 1" x 6" x 6' redwood fence boards at your local home improvement store for about $2.00 per board and cut the board long wise in half and then cut them in half the other way.  You will end up with 4 - 3' fence boards,  2 with flat ends on both ends and 2 with a flat end and a diagonal cut end for about 50 cents each.   Hence the pattern in our 'fence'. 

I leave it to you to figure out where to mount your fence boards.  The trick is keeping them even.  And trust me it was a trick :)  And keeping the bottom edge straight.  We did have to do a bit of chopping here to make everything work.

Once everything is put together then take the fence down and white wash it.  I did it with exterior paint mixed with a lot of water.  Came out awesome.  Then remount when it is dry.

What do you think?  

Enjoy!

Wednesday, March 7, 2012

New Addition to My Garden

So my husband and I have been looking for ways to expand our gardening area. We have a little back yard and space is at a premium. Especially space where there is actual sunlight for at least 6 hours. So I was on Pinterest and came across this amazing looking tiered planting bed. It was a kit and the price was a bit more than my budget could handle plus it was in cedar (I think), well it wasn't in redwood, which is what all our other planting beds are made of. I'm obsessive compulsive about everything matching.  So I showed it to my husband. He said 'if you can draw the plans up for me then I can build it'. Well after staring at the website I realize that it is just a series of boxes stacked on top of each other and joined at the back corner by screwing the boxes into a 2 x 4 so I scribbled a bit and Tada!


It was easier than we thought - and doesn't it look amazing :)

Your going to need 8 - 2" x 8" x 8' and 1 - 2" x 4" x 8' (we were only able to find the 2" x 8" boards at Lowes)  and a box of 2 5/8" Deck Screws
For tools you will need something to cut the boards with (we used a circular saw) 
and an electric drill (to do the pre-drill so that the boards won't split when putting in the screws) 
and electric screw driver

You cut the boards thus:
5 of the boards need to be cut in half (exactly as possible) these are the fronts and backs of each of the boxes you will be building
The sides are as follows:
You need:
2 - 48"
2 - 36"
2 - 28"
2 - 19"
2 - 10"

We were able to combine the 36" board with the 10" and the 28" boards with the 19" so all of the above only used 3 boards.

Finally cut the 2 x 4 into 2 approximately 40" lengths - there will be a bit left over.


Then comes assembly:

We put the boards in so that the sides went butt up against the ends.  That way we knew that the width of the box would be a uniform 4'.   We pre-drilled all the holes (2 in each board) and then assembled with the deck screws.

After assembling the boxes we started stacking them just one at a time with the two 2" x 4"'s in the back corner with the narrow part of the 2" x 4" against the back wall and the wide part against the side.   Again we pre-drilled and then screwed it together.  Continue the stacking and screwing to complete the assembly.  A nice plus in doing it this way is that it squared itself as we screwed it into the 2" x 4" board.


Finally, it takes a lot of dirt to fill this so we put our heavy clay soil in the back of the unit until it was about 1/2 full being careful not to get any in the front part then we bought garden soil (I don't remember the brand) and it took about 6 - 3 cubic ft bags to fill it.

Those are strawberries your looking at and the second to the top opening has beets planted.  I plan on putting herbs in the top.  You may be noticing too our next project stacked just to the left of our box.  Making a potato tower next.  Wooohoo!  Enjoy!


Monday, February 20, 2012

My Spice Rack :)

So I found my digital camera this weekend and am experimenting with photographing things that my Husband, Jeffery and I have done to the house.  First off - my spice rack.  I absolutely hate digging through the cabinets to find whatever spices I am looking for and I have no counter space for any counter top spice rack so quite a while back I had my Husband build me a box (for want of a better word) which he mounted on the wall.  Simple pine 1" x 3" - cut - screwed together and painted white.  The mounting bracket is actually on the top and since the spice racks are so high you can't see them. 


Then I went down to the local Cost Plus and found these small white lidded bottles - perfect for spices. I wrote on the top of each bottle (which you can't see unless you lift down the bottle so no glaring labels).  I also added some hooks on the bottom for hanging kitchen shears.

I actually have 2 of these - one on each side of my garden window.  They work perfectly.

This shot shows the dimensions of the box better.  Depending on what spice bottles you find you can customize them for your wall.


  Love it!  Enjoy!

Monday, January 9, 2012

Kitchen Idea

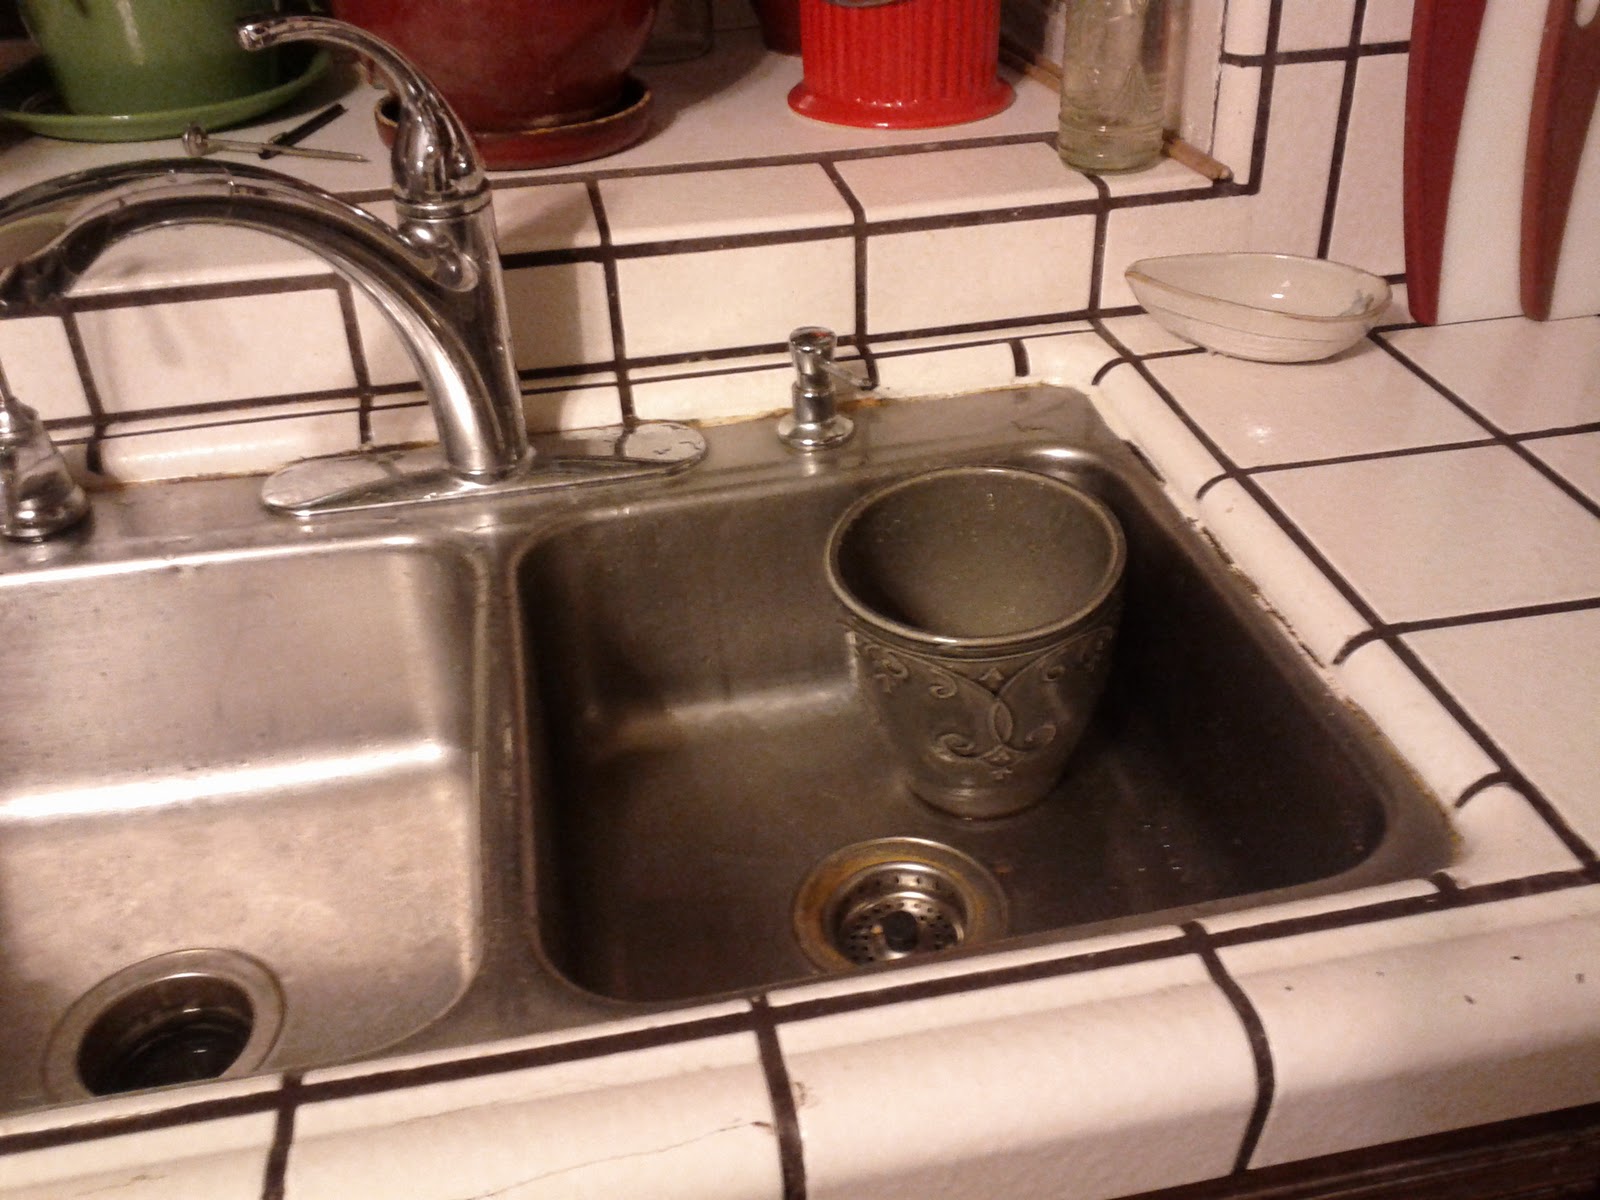
So I have been having trouble with silverware taking a dump in my disposal in the sink.  So I pondered what to do to stop the madness.  Also I really hate having silverware everywhere in my sink so . . .


So I found this flower pot at the local 'shop for less' place and put it in the sink.  It has no hole in the bottom so that the water will soak the silverware.  It's also the color of the sink and it's glazed really well so that it will repel water (some pots soak it in) which will keep mold, as an issue, at bay.


Please ignore the dishes.  But look all the silverware in the pot.  Worked!  Enjoy!

Wednesday, January 4, 2012

Getting Organized! The Honey Do List.

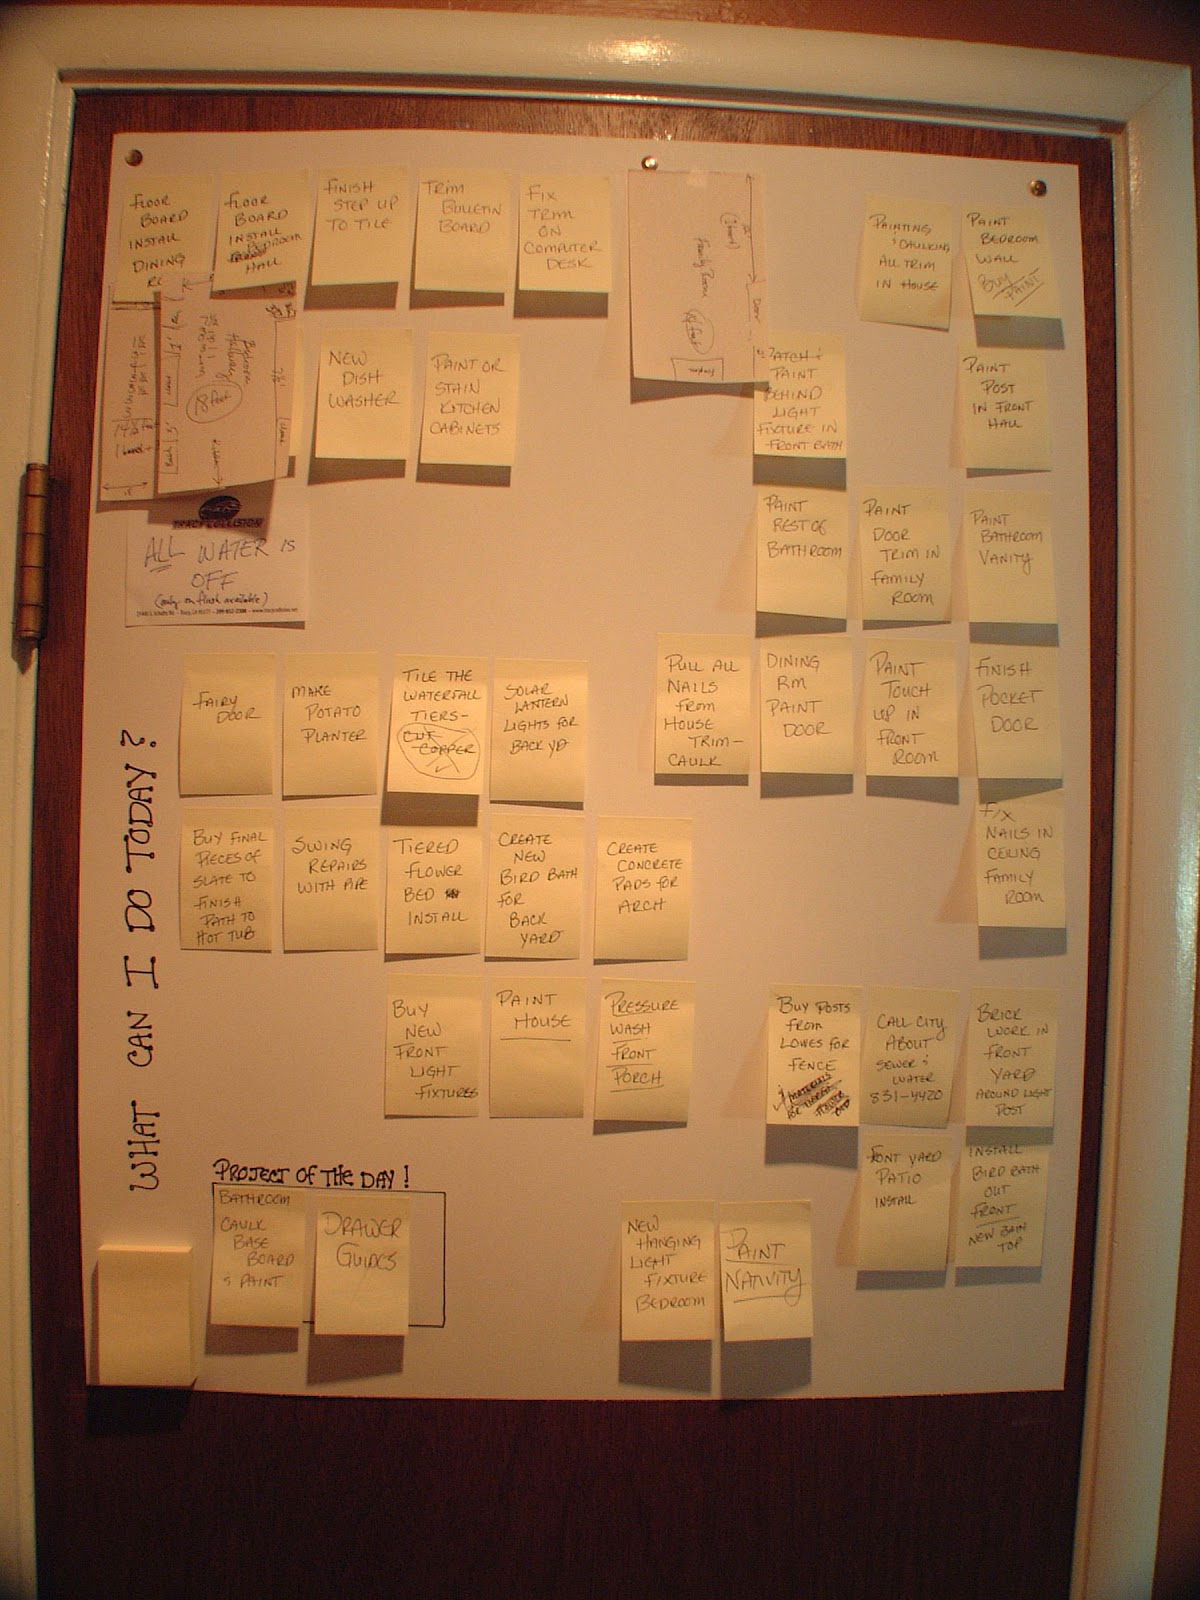
We have way to many projects and my sweet husband, Jeffery, is always saying what can I get done today. We have tried various lists to keep ourselves on task but they just get lost in the shuffle. So I came up with an idea. It's a 'What Can I Do Today' list using post it notes. That way we can add and subtract from our list without any mess.    Sorry the photo is a bit dark (I may have to replace that).  The little square at the bottom says 'Projects of the Day'.  It helps keep us on task.  The whole thing is on a piece of poster board and thumb tacked to a door.  I even glued a post it note pad to the bottom corner for easy adds to the list.  Enjoy!

My Crazy Bulletin Board Wall

Several years ago I realized that those tiny little bulletin boards they sell at the store were totally too small for all the things I wanted to post.  So with the help of my family we came up with a design that fills the hallway with a bulletin board. It's made with a piece of masonite, 12 x 12 cork boards, fabric and glue.


It really wasn't that hard but it wasn't a weekend project either.  We started out with a piece of masonite that measured 4' x 6'.  Which my husband screwed to the wall - into the studs.  We decided to first put a piece of masonite on the wall so that if we ever decided to remove the bulletin board then it would be a simple matter of tearing off the squares and then unscrewing the board from the wall.  A quick patch of the holes and the wall would be good as new.

Then the kids and I did various drawings with the idea that we would be using 12" x 12" cork boards from Walmart to create the pattern.  I didn't want sheets of cork.  I wanted the ability to make it 'art work' in my hall and Walmart had the cheapest 12" x 12" cork pieces (they sell them in packages of 4). 

Once the pattern was decided on it was off to our local fabric store to see what we could come up with.  The decision was blue, orange, brown and neutrals.   The fabric squares had to be 16" x 16" so I would have enough edge to wrap around behind the cork square.  And since some of the design was on an angle I had to sew some of the squares so that they were half one color and half another.  Then everything was ironed and I got out the spray glue.

Now you really have to glue in an open area.  Trust me on this one.  Don't try this in your home.  Take it outside on a clear, windless day.  Each Cork board was sprayed with spray glue.  Then with two people work together, we lifted each fabric square by the corners and slowly lowered it to the cork.  Then I pushed out any wrinkles and we were good to go. 

After everything dried I then hand glued the extra fabric around the back using tacky glue.  This took a lot of time.  Once everything was dried then it was time for the mounting on the masonite.  I spread a LOT of tacky glue on the masonite and then we applied the squares.  Yes, they do have a tendency to try and fall off at first.  So we used masking tape and taped from the wall under the board to the wall over the board.  And then one of us just stood there for the better part of 1/2 an hour pushing each square firmly against the wall. 

Finally after all this dried we are 'supposed' to put a piece of quarter round trim around the board (still on my list).  But I think it looks great and is finally big enough.  Enjoy!